
Many factors can influence the success of GPU Passthrough. On some newer systems, notably low and mid-end Ryzen platforms, there’s a little extra legwork you’ll need to do to get your OS to boot with the correct GPU, and the processes that go into making that happen are somewhat complicated.
Need help Building your passthrough gaming PC? Check out our VFIO Increments page!
Luckily, we’re here to explain what you need to do, and why. During the boot-up of a machine, the UEFI firmware enumerates and initializes devices. UEFI stands for Unified Extensible Firmware Interface, and it is the first code run by the CPU. Devices initialized by UEFI include PCI and PCI Express devices, including the primary GPU. This is because UEFI setup menus, along with boot splash screens, must work in a generic way, as UEFI cannot possibly include a driver for every possible GPU.
How does this relate to GPU Passthrough? The guest has its own UEFI called OVMF, which stands for Open Virtual Machine Firmware. Its source is available on GitHub. Much like the host system’s UEFI, it also enumerates and initializes devices. The trouble arises at this step. If the host UEFI already initialized the device, the host UEFI makes a “shadow” copy of the GPU’s vBIOS on startup, and that is what Linux exposes as the device’s vBIOS. The guest’s UEFI expects to see a full vBIOS and instead sees a shadow copy. OVMF usually hangs at this stage.
Solutions?
One possible solution involves the CSM. CSM is UEFI’s Compatibility Support Module. It emulates a traditional PC BIOS. With this enabled, many motherboards will switch their boot order and set another GPU as the “primary” GPU – which the UEFI initializes. The virtual machine will now have a fresh vBIOS to work with and will boot properly.
If this is not an option for you, or it does not work – you still have options. It is possible to pass through a boot GPU, albeit with some tweaking. You will need to ensure that the host system is not using it. You will also need to ensure that the guest is exposed the correct vBIOS. The next two sections will walk you through this.
efifb=off
Linux shows boot logs and tty logins on the console. On desktop Linux distributions, the console is output to a framebuffer. The graphics driver or the EFI/BIOS can provide this framebuffer. Early on in the Linux boot process, before graphics drivers load, Linux uses the EFI/VESA framebuffer, depending on whether the system is booted using UEFI or traditional BIOS. Whichever is in use, it does not make a difference. Linux will use the primary GPU, selected by the system firmware.
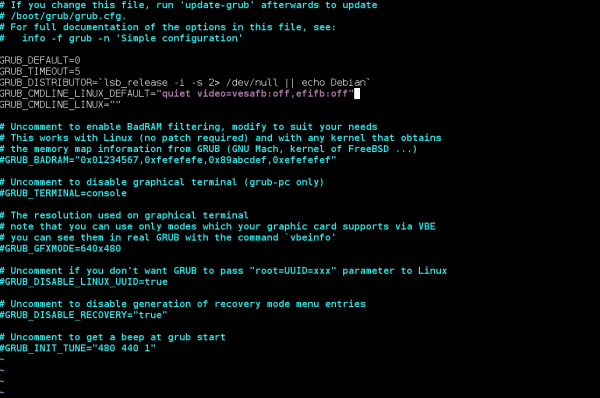
For GPU Passthrough, you do not want anything using the guest card. For this reason, you will need to add a kernel command-line parameter to disable the EFI/VESA framebuffer. Most Linux distributions default to GRUB. To add a kernel command line option to GRUB, open /etc/default/grub and find the following line:
GRUB_CMDLINE_LINUX_DEFAULT="quiet intel_iommu=on"
Depending on your CPU and distribution, this line may differ. This is not of concern to us, as you only need to add one option to it:
GRUB_CMDLINE_LINUX_DEFAULT="quiet intel_iommu=on video=efifb:off"
Save and exit the file. After this, you will need to regenerate the GRUB configuration. While this may vary from distribution to distribution, particularly Fedora, this command usually does the trick:
sudo grub-mkconfig -o /boot/grub/grub.cfg
But wait! Before you reboot, ensure that your display manager is configured to auto-start. If you usually run startx to log in, it may stop working as you may not have a tty afterwards. This all depends entirely on your graphics drivers. Open source drivers will generally be more friendly towards ttys, but the NVIDIA proprietary graphics driver often has trouble.
UPDATE 2/6/2018: If after a reboot the GPU still will not pass through, and you have ensured that it is bound to the vfio-pci driver, it could potentially be the X server attempting to claim the guest GPU. The solution to this will depend on your host GPU. Create the file /etc/X11/xorg.conf.d/10-gpus.conf and add:
# For AMD
Section "Device"
  Identifier "AMD"
  Driver "amdgpu"
EndSection

# For Intel
Section "Device"
  Identifier "INTEL"
  Driver "modesetting" # You can change to "intel" rather than "modesetting" if you use xf86-video-intel for any reason
EndSection
For users with NVIDIA host cards, run the following command:
sudo nvidia-xconfig --xconfig=/dev/null --output-xconfig=/etc/X11/xorg.conf
Note that nvidia-xconfig will complain about /dev/null being an incomplete file – ignore this warning, as it allows us to generate a fresh X.org configuration.
vBIOSes
QEMU can expose the vBIOS from a ROM file supplied to it by libvirt. Before you will be able to do this, you will need a ROM file. TechPowerUp has an extensive collection of vBIOSes, ranging across NVIDIA, AMD, and ATI cards of many eras. Once downloaded, configure libvirt to expose the ROM file to the virtual machine. To do this, open your XML and search for your GPU’s hostdev section. It will look something like this, albeit with different addresses:
<hostdev mode='subsystem' type='pci' managed='yes'>
 <source>
 <address domain='0x0000' bus='0x01' slot='0x00' function='0x0'/>
 </source>
 <address type='pci' domain='0x0000' bus='0x00' slot='0x04' function='0x0'/>
</hostdev>
You will need to add a vBIOS to it, like this:
<hostdev mode='subsystem' type='pci' managed='yes'>
 <source>
 <address domain='0x0000' bus='0x01' slot='0x00' function='0x0'/>
 </source>
 <rom file='/path/to/vbios.rom'/>
 <address type='pci' domain='0x0000' bus='0x00' slot='0x04' function='0x0'/>
</hostdev>
After making sure that QEMU’s user has read access to the ROM file, start your VM. It should now Just Work(TM)!
Join our Discord to chat with other readers and find VFIO help/support.
Images courtesy PixaBay