THIS GUIDE IS OLD AND OUT OF DATE.
It is here for historical purposes only. If you want to make an OSX VM please follow our new guide here. It’s much more simple and straightforward.
For a few years now, thanks to the hard work of others in the QEMU/KVM community, the ability to use the macOS operating system on our KVM powered virtual machines is now a reality. We can also enable a much better user experience for OSX virtual machines using GPU Passthrough.
Read Also: Benchmarking Linux OGL performance with Bugle
In this guide we will be showing you how to create a Hackintosh-KVM virtual machine using QEMU’s i440fx chipset, with the added benefit of using host passthrough of the CPU, instead of using the Penryn emulation that tends to be the usual way to get OSX up and running.
This guide will also be setting up these VMs as “Hackintosh” systems. We will not be using Apple’s actual OSK(SMC) key, which is an attempt to make your virtual machine a “Real Macintosh.” This information is provided for entertainment purposes only and The Passthrough POST waives all liability for any and all of what you do with it.
The main reason this guide focuses on the i440fx chipset is that there are still a few wrinkles that need to be ironed out on q35 with 10 series Nvidia GPUs and host CPU pass-through, whereas i440fx works well regardless of the host system’s hardware. If you want to find q35 chipset guides, they are available elsewhere for the time being. We will be adding an additional guide to Hackintosh-KVM series concentrating on the q35 chipset soon, after some testing is done to ensure it works with host CPU pass-through, macOS updates, and stability in general. We encourage others in the VFIO community to join our Discord server and help us out to work out other issues in the future.
Synopsis
- This guide assumes that you already have set up a GPU pass-through virtual machine in the past and have experience with QEMU and libvirt, no support/steps will be given in the Hackintosh-KVM guide for setting up QEMU/libvirt for GPU pass-through, networking, CPU pinning, etc. If you need help with setting that up, refer to the The Passthrough POST Discord server.
- This guide has only been tested with Ryzen CPUs. Your mileage may vary when using a Intel CPU (though we don’t expect any issues.) We encourage our readers to help contribute their experiences with Intel hosts, so this guide can be updated as appropriate.
- The author also recommends that the initial setup to be done via GPU pass-through for ease of installation, as other display methods may or may not work(QXL,vmwvga,etc).
- Clover is only to be used as it’s needed for the various tweaks within this guide. We will not supporting the Enoch or any other bootloader at any time during the Hackintosh-KVM guide.
- We recommend using the OVMF files from the Hackintosh-KVM repo. We also recommend using recent versions of the kernel, libvirt, and QEMU. This is not guaranteed to work on versions older what was tested at the time this article was written.
- For older or patched versions of QEMU and other applications, refer to kholia’s guide on github for additional patching/procedures.
- We recommend using LVM or a standard image file(.img) to achieve the best I/O performance possible, using a .qcow2 image file with QEMU’s emulated SATA controller leads to rather abysmal performance in our testing. ZFS vdevs can also be used, but this has not been tested at the time of this write-up for disk I/O performance, although they should perform fine.
- The author also recommends setting the CPU governor to performance and/or use a QEMU hook to ensure that the virtual machine is at its utmost performance. The xml file from the Hackintosh-KVM repository contains arguments for PulseAudio and evdev pass-through. If you plan to use this, you will want to make sure that evdev and PulseAudio pass-through are set up and working correctly beforehand.
- We will be using the iMac18,3 SMBIOS with Clover as other versions of Macintosh’s include Thunderbolt 3 firmware, which upon update, will corrupt OVMF’s nvram, thus making the virtual machine unbootable.
Author’s Host System
- Gentoo using a AMD Ryzen 5 1600 CPU with a Nvidia GTX1070 FE GPU for graphics pass-through. This was also tested with a AMD Ryzen 7 2700X and EVGA GTX1050 Ti FTW. Mojave breaks support for 9 and 10 series GPUs and 20 series cards will be totally unsupported.
- Tested with QEMU 2.12 using a patched OVMF that the author created, which is located in the Hackintosh-KVM repository, and Linux kernel 4.17 (4.16 was also tested to be working too).
- You will need a CPU with at least SSE4.1 to use macOS High Sierra/Mojave. Intel VT-x / AMD SVM is required.
Installation Prerequisites
- Download the macOS High Sierra installer from the Apple App Store. Use the
create_highsierra_iso.shscript from the Hackintosh-KVM repository to create a ISO for the virtual machine. - Run the ISO creation script
create_iso_highsierra.shon your real Macintosh. The High Sierra ISO file will be located in the Desktop folder when it is finished. - If you do not want to use the script from the Hackintosh-KVM for creating a ISO file, you can also refer to:
https://www.tweaking4all.com/cd-dvd-blu-ray-disc-burning/burning-for-macmacOS/convert-dmg-to-iso/for information on how make a ISO file for your virtual machine on your real Macintosh. - Lastly, copy the generated ISO image from your Macintosh’s Desktop folder to your host QEMU/KVM machine via Samba/NFS, or use a USB drive.
Hackintosh-KVM Preparation steps
Update: As of 10/20/2018 the repository location changed to the TPP Github repository
- To get started, clone the repository listed below. The files included in this repository are necessary for creation of the virtual machine and will also be needed when you install Clover to the EFI folder of your Hackintosh install.
git clone https://github.com/PassthroughPOST/Hackintosh-KVM- Before you get started on anything else, you will want to define the xml, as root, using
virsh define osx_i440fx.xmlfrom the folder you have it located in. Next you will want to use Virtual Machine Manager to add your GPU, disks, and any other devices you plan on passing to the virtual machine. After that, you will want to open the xml file for the virtual machine and edit it for the location of your OVMF files, CPU pinning, and evdev pass-through. This can be achieved viavirsh edit osx_i440fx. If you do not intend to use PulseAudio or evdev pass-through, delete the corresponding lines to those in the xml file. - The xml will have a
virtio-netadapter on a bridged network interface, you may want to change from the bridged interface if this doesn’t match your network topology. - To enable pass-through of our hosts CPU feature flags we will be faking the CPU vendor ID via the QEMU argument shown below, do note that this will override what you have set in Virtual Machine Manager’s CPUs menu.
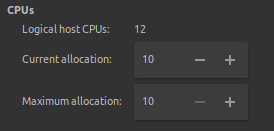
It is not recommended to set the CPU topology for multi-threading while in this menu, due to a bug in Clover, and instead to only set the amount of cores in the current and maximum allocation menus to the amount we want for the virtual machine. The reason for this is multi-threading does not work as intended with the QEMU and macOS. Passing the virtual CPU’s as sockets(which is default), or up 8 cores and 1 thread, has lead to far better CPU performance in the authors testing.
qemu:arg value='-cpu'
qemu:arg value='host,vendor=GenuineIntel,kvm=on,vmware-cpuid-freq=on,+invtsc,+hypervisor'
- Create a virtual HDD where macOS will be installed. This can be done via Virtual Machine Manager’s Storage utility which is located in > Edit > Connection Details > Storage > Add-Pool, to create storage pool(s).
- Create a Clover boot disk,
libguestfsis a required dependency. (The steps below are optional) - To start off, you will want to edit
$HOME/YourFolderHere/config.plistand set the desired screen resolution(OVMF by default is 1024×768). Do note that you may experience display corruption with higher resolutions, be sure to set this properly.
sudo ./clover-image.sh --iso Clover-v2.4k-4630-X64.iso --cfg $HOME/YourFolderHere/config.plist --img clover.qcow2
- Next you will want to add some kext files to your newly created clover boot disk. The kexts files needed are also located in the Hackintosh-KVM repository. The kext files in this repository are used for GPU sensors, PulseAudio pass-through, and the Virtio-Net network device. The WhateverGreen kext is also needed if you use a AMD GPU, however it has not been tested. This step will also require the NBD kernel module to be loaded.
- Connect and mount the clover.qcow2 image:
sudo modprobe nbd
 sudo qemu-nbd --connect=/dev/nbd0 /$HOME/YourFolderHere/clover.qcow2
 fdisk /dev/nbd0 -l
sudo mount /dev/nbd0p1 /mnt/somemntpoint/ - Disconnect and unmount from the clover.qcow2 image:
umount /mnt/somemntpoint/
 sudo qemu-nbd --disconnect /dev/nbd0
sudo rmmod nbd - Instead of building your own bootable Clover disk, you may want to use the included
clover.qcow2disk image from the Hackintosh-KVM repository instead for ease of use, as this contains all the kext files needed, and offers a 1920×1080 screen resolution. It should be noted that the clover.qcow2 image can be useful as backup EFI bootloader in case you were to mess up your bootloader during a Clover update. - Before fully starting Clover on your new virtual machine, you will want to make sure that the OVMF resolution is set equal to the resolution set in your clover.qcow2 file. The OVMF default is 1024×768 and the clover.qcow2 image you will be using is set to 1920×1080, not setting this correctly will lead to display corruption and possible boot failures. The resolution can be set via the OVMF boot menu, which is able to be reached by pressing the ESC button on your keyboard during the OVMF boot logo, before the Clover boot screen appears.
Installer Steps
- After booting, the initial language selection should show up. Select your preferred language, then select Disk Utility and erase your target disk. You can use HFS+ or APFS, as the clover.qcow2 image we are using has the proper EFI files for either file system. If you do choose APFS, make sure you place the apfs.efi file into your EFI folder when you install Clover to your boot disk.
- High Sierra’s (< 10.13.3) Disk Utility does not recognize un-formatted disks, unless you click View > Show All Devices, quit Disk Utility, then relaunch it.
- In some rare cases the target disk may not not appear in Disk Utility, for that you will need to use the Terminal app on the installer and prepare the hard drive for installation manually using the commands below.
diskutil list
diskutil eraseDisk JHFS+ macOS disk0 # Adapt this according to your system
- When you are done, quit Terminal.
- Now, you can continue with the installation as you normally would.
- When you are finished, the virtual machine will reboot automatically and the first time setup screen will appear, congratulations, you now have a Hackintosh-KVM virtual machine with close to bare metal performance! Hold on though, you’re not done yet, the last step is to follow the Post-Install Steps below, and put the Clover bootloader on the drive you just installed macOS to, so you can have the benefit of adding additional kext files, etc., in the future to make your virtual machine work better.
Post-Install Steps
First, you will want to install Clover to the main disk where macOS High Sierra was installed in the previous steps. You will also want to use the config.plist and i440fx-acpi-dsdt.aml files from the Hackintosh-KVM repository, as this has everything set as it would be in the clover.qcow2 image. The i440fx-acpi-dsdt.aml file will be placed in the EFI/CLOVER/ACPI/origin folder. Be sure not to forget the kext files you need and place them into the Kexts folder.
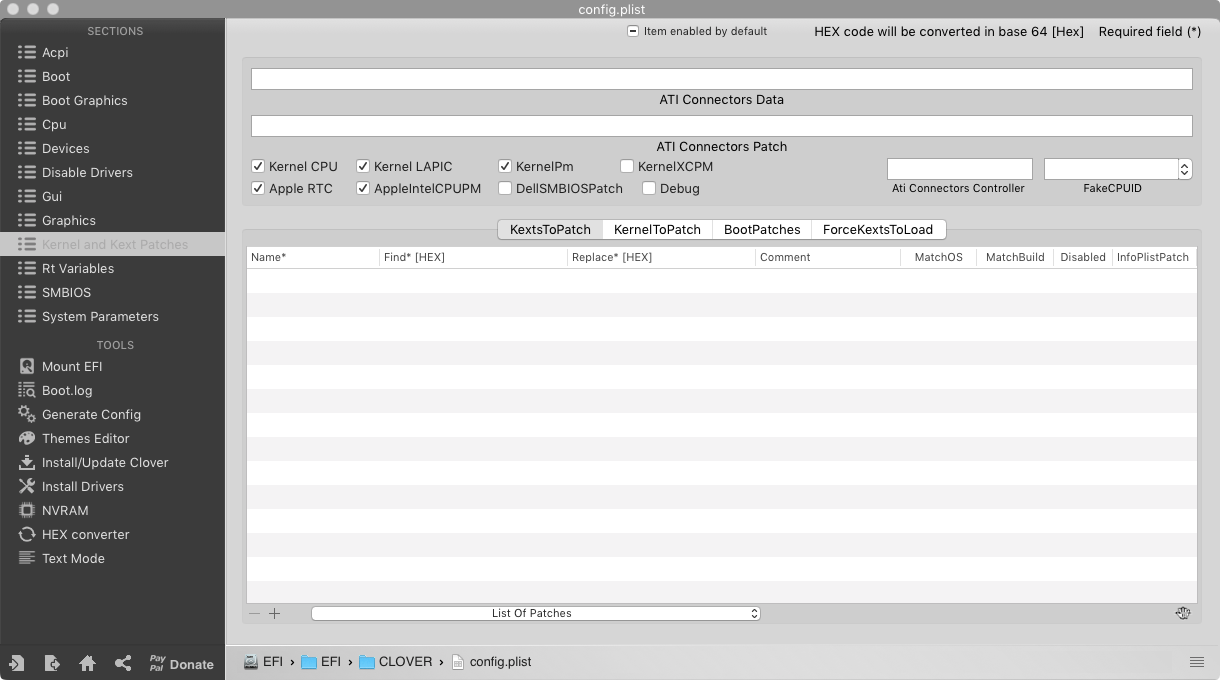
To use QEMU’s “host” CPU model you will need to make sure that these options are enabled in Clover Configurator’s “Kernel and Kext Patches” section.
You will also want to remove the +hypervisor bit from the QEMU cpu argument at the bottom of the xml file and set in Clover Configurator’s CPU section your system clocks as close as possible.
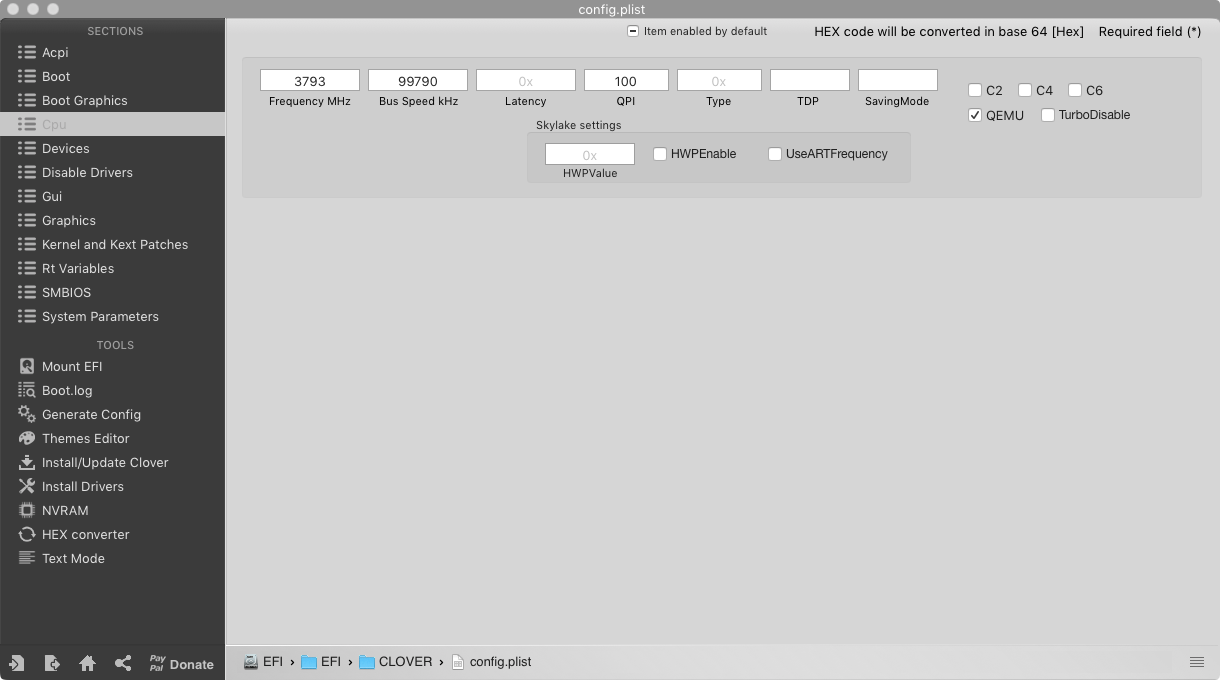
qemu:arg value='-cpu'
qemu:arg value='host,vendor=GenuineIntel,kvm=on,vmware-cpuid-freq=on,+invtsc'
To enable PS/2 mouse and keyboard emulation the VoodooPS2.kext will be needed, for ICH6 or ICH9 PulseAudio pass-through the VoodooHDA.kext is needed. The author found that using the emulated USB mouse and keyboard drivers, the keys have would have issues with sticking during a long keystroke on the authors hardware. Your mileage may vary here and technically no additional kext file is needed to use QEMU’s emulated USB mouse and keyboard.
For mounting of other filesystems (NTFS,EXT4,etc.) refer to:
https://github.com/macOSfuse/macOSfuse
For a quick way to install Nvidia drivers refer to:
https://github.com/Benjamin-Dobell/nvidia-update/blob/master/README.md
If you like what we do here, consider supporting us on Patreon.
Images courtesy PixaBay