So far, you should have a working CentOS creative workstation, and know the pros and cons of building one. Maybe you’re not sure how to get started with it, though. That’s fine. It’s a new environment and things are going to work differently here.
In this installment of the Linux video production guide, we’ll be going over some tweaks you can make to help with the transition. Some things will be straightforward, others you’ll only know to do if you’re familiar with linux. All of them will help make your working experience better.
Index
If you’ve arrived here without context, you may want to read the other installments in this series first:
- Part 1: Rationale and Hardware for Linux Creative Work
- Part 2: Initial Workstation Setup
- Part 3: Finishing Touches and Workflow Adjustments (You are Here)
Consider supporting us if you value independent tech news and research. This site will always be free of ads and sponsored content.
Final Setup Steps
Configuring Specialty Hardware
If you have a graphics tablet or a colorimeter, now’s the time to set them up. Tablets are straightforward as long as you’re using wacom. Just run sudo yum install libwacom xorg-x11-drv-wacom and plug in your tablet. For Colorimeters, install DisplayCAL as described in part 2, and generate/install an ICC profile for each monitor by following the calibration prompts.
You can also calibrate Resolve’s HDMI output if you’re using a proofing display with a Decklink or Intensity product. To do this, go to Workspace > Monitor Calibration > SpectraCal CalMan in Resolve. This should give you a popup dialog asking for an IP address. Now open DisplayCAL, select “Resolve” as the display, and paste the address it gives you into the dialog. From there, the process is the same as other displays. DisplayCAL will generate a 3DLut for you to select in Resolves “color management” tab in the main settings window.
There may be other things you want to set up here, like audio interfaces, speakers, capture and playback systems, etc. However, these are all very straightforward if they aren’t completely plug and play in the first place. You can install OBS with sudo yum install obs-studio to test capture solutions if you aren’t familiar with Resolve or programs like media express yet.
Familiarize Yourself with the Resolve Filesystem
Davinci Resolve runs a database on top of your native filesystem to help with asset organization and project management. It will automatically index files on paths you designate. You can add a device or path by going to Resolve > Preferences > Media Storage and clicking “add.” The first path you choose will be the location of your footage and stills cache, so make sure to choose a fast SSD, preferably one you’ve dedicated as a scratch disk.
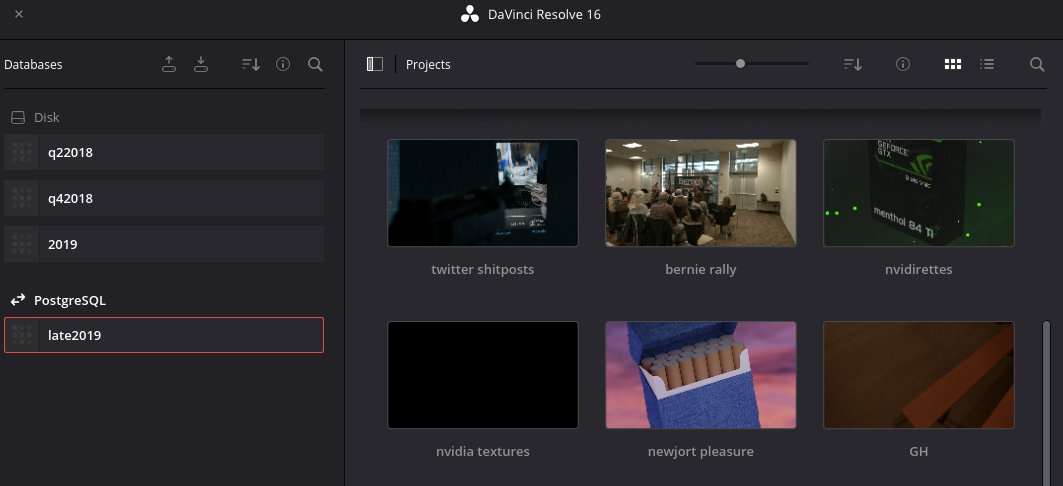
Resolve project selection screen, with databases listed on the left.
It’s important to stay organized when you’re importing footage, especially as you work on more projects over time. I have my scratch SSD mounted at /scratch, softraid mounted at /storage, so I’ve made 2 folders on the RAID — VFX and Footage. So my paths are as follows: /scratch, /storage/Footage, and /storage/VFX. The render cache is being saved to a separate disk from the source footage and effects sequences, which improves performance on large projects. I also have a /render SSD for deliverables, but separating this only has marginal benefits. Even if you aren’t using a RAID solution, having separate disks can still improve performance by increasing total available I/O bandwidth.
At this point, I’d also make an ingestion directory in your storage pool somewhere. Don’t add this folder to the Resolve media storage paths, though. This folder will act as a dumping and staging ground for media that you need to transcode or edit before it goes into your project. I’ve mounted mine at /storage/Ingestion.
Set up Backups
You’re going to lose data eventually in this line of work, so you should probably set up a backup service or schedule before you have any that you need to keep. There’s dozens of options out there, from using rsync with your NAS, uploading to cloud storage, to dumping your files to an offline hard drive and putting it in storage.
If you’re not familiar with networked backups, we also have a tutorial on using a much easier program, called Syncthing. It’ll get you mostly there without having to understand much about how it works. If you use hard drives as cold storage, I’d recommend budgeting for a few large HDDs a year in your work expenses. It’ll usually be cheaper than cloud storage, but you need to consider that cost for yourself.
Software Tweaks
Resolve Defaults
There are a few settings here you probably want to change. The default profile uses DCI 2K, S curves for contrast, and defaults your Luma mix to 100%. All of these pose small inconveniences, so it’s best to get rid of them first thing. The project resolution can be changed in master settings in the project settings menu (small gear, bottom right), and the other two can be toggled in the “general options” tab in the color subsection. I’d recommend changing them from the defaults because they make certain aspects of color grading more difficult, and if you don’t know what you’re looking for, they can make your work very frustrating. You can make these default by saving a new profile or overriding the default one.
Next, go to Resolve > Preferences > User > Project Save and Load, and enable live save and project backups at an interval you deem appropriate. This will stop you from losing data if the NLE crashes or some other problem surfaces. If you aren’t getting audio playback, there are 2 possibilities. The first is you’re using an audio format that Resolve doesn’t natively support. The second is your audio device wasn’t picked up properly by Resolve. If you try playing a .wav or ProRes .mov with no luck, go to Resolve > Preferences > System > Video and Audio I/O, and change your device to ‘default’ and each channel to the corresponding ALSA channel.
Resolve’s Preferences menu separates system and user settings
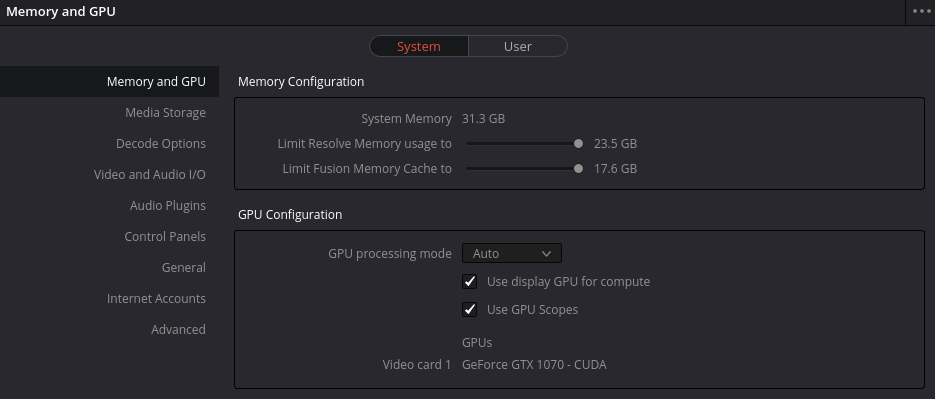
You may also want to allow Resolve to allocate more memory for demanding projects. Go to Resolve > Preferences, and in the Memory and GPU tab, turn the memory sliders up to the maximum (or the desired amount). You may also want to check that your GPU is recognized and in use while you’re there.
Auto-Transcode Your Footage
As mentioned in other installments, Davinci Resolve doesn’t play well with compressed audio on Linux. There’s a really easy way to get around this problem if you don’t have equipment that can shoot in a good codec, though. We can use incron, a scheduling tool that uses filesystem events, to automatically convert footage to something Resolve can use. You can even do this losslessly and extremely quickly, if you own the studio version.
First, install incron with sudo yum install incron. incron works by looking for events on your filesystem, and executing a command when it picks one up. So we set it to look for new footage, and start transcoding it when it finishes copying. To achieve this, you need ffmpeg if you haven’t already installed it (sudo yum install ffmpeg).
Then, run these commands:
// Commands preceded by # are run as root (or via sudo) and $ run as user, // are comments and should not be run.
// Commands can be pasted into terminal by using ctrl + shift+ V
// Replace YOUR_EDITOR_HERE with your preferred text editor. If you're not sure what editor to use, use nano.
// If you are comfortable with vi/vim, this part of the command is optional.

# systemctl enable incrond
# systemctl start incrond
$ EDITOR=YOUR_EDITOR_HERE incrontab -e
From here, you need to add a command that tells incrontab to do something when it detects that a new file has been copied to a folder and completed:
// For Resolve Studio, add this line. It doesn't degrade footage quality in any way:

/storage/Ingestion IN_CLOSE_WRITE /usr/bin/ffmpeg -i $@/$# -c:v copy -c:a pcm_s16be /storage/Footage/$#.mov

// For The free version of Resolve. This will convert your files to ProRes, and should not degrade quality much:

/storage/Ingestion IN_CLOSE_WRITE /usr/bin/ffmpeg -i $@/$# -c:v prores_ks -profile:v 3 -c:a pcm_s16be /storage/Footage/$#.mov

// save the file and exit, then list the current rules to confirm:

$ incrontab -l
Confirm That Incron Works
The first path in the command is the location that incrontab will watch. IN_CLOSE_WRITE tells it to watch for files that have finished writing. The rest of the text is an ffmpeg command that converts your footage into something Resolve can use. -c:a pcm_s16be tells ffmpeg to reformat the audio to uncompressed PCM 16 bit. $# is a “wildcard” that uses the file detected by incrontab and $@ is the watched path. For this example we’re using /storage/Ingestion as our watched folder and /storage/Footage as our destination. You can edit these if you’ve set up your system differently. It’s important to use .mov containers because .mp4 files do not support uncompressed audio.
Test that the changes have worked after saving the configuration file by copying a video into the ingestion folder. You should have a file of the same name (plus.mov) in the output folder that works in Resolve after the process finishes. Some special characters, like parentheses, may interfere with the normal function of the script, but most cameras stick to alphanumeric naming.
Note that this method will not overwrite files of the same name if one exists. You can change this behavior by moving the finished files out of the output folder, or adding -y right after /usr/bin/ffmpeg. This shouldn’t be an issue in the first place as long as your camera or recorder uses unique file names. Quality can be adjusted in the free version line by adjusting -profile:v to a number between 0 and 2 if the default value creates video files that are too large for your taste.
Change System Hotkeys
Certain global shortcuts may interfere with some application hotkeys. Generally, I’d change any hotkey using the Alt key to use the Super (Meta, Windows, whatever) key instead, as this will clear most of the problematic ones.
In KDE, this can be done by opening System Settings, clicking Shortcuts and Gestures, and Then changing each offending shortcut in the Global Keyboard Shortcut Dialog. While you’re here, you might also want to go to the main settings menu, then Window Behavior > Window Behavior > Window Actions and change the “Modifier Key” to Meta to stop it interfering with Alt + Click. In GNOME, hotkeys can be changed in much the same way.
That’s Pretty Much It.
From here, you have everything you need to work efficiently on video and effects projects in a Linux environment. Other programs come with their own quirks on Linux, but this will get you as far as you need to work efficiently. Let us know if you like this content, and what else you’d like us to cover in this arena. We’d love to hear from you.
Consider Supporting us on Patreon if you like our work and want a say in what we cover and access to early content. We provide RSS feeds as well as regular updates on Twitter if you want to be the first to know about the next part in this series or other projects we’re working on. If you need help or have questions about any of our articles, you can find us on our Discord.