If you’ve read through the first post, and you’re wondering how the information presented there fits together, that’s what this installment is for. We’ll be covering system setup, order of operations, and some tips and best practices for different hardware/software configurations.
If you’re used to a different distro or you’re not very experienced with Linux in general, there should be enough info to get you started. That said, we’ll also be touching on some more advanced concepts that might go over your head. For the most part they’re optional, though, so don’t feel like you have to do something you don’t understand. If you aren’t sure what you can skip, just ask in our Discord and someone will be sure to help you.
Index
If you’ve arrived here without context, you may want to read the other installments in this series first:
- Part 1: Rationale and Hardware for Linux Creative Work
- Part 2: Initial Workstation Setup (You Are Here)
- Part 3: Finishing Touches and Workflow Adjustments
Consider supporting us if you value independent tech news and research. This site will always be free of ads and sponsored content.
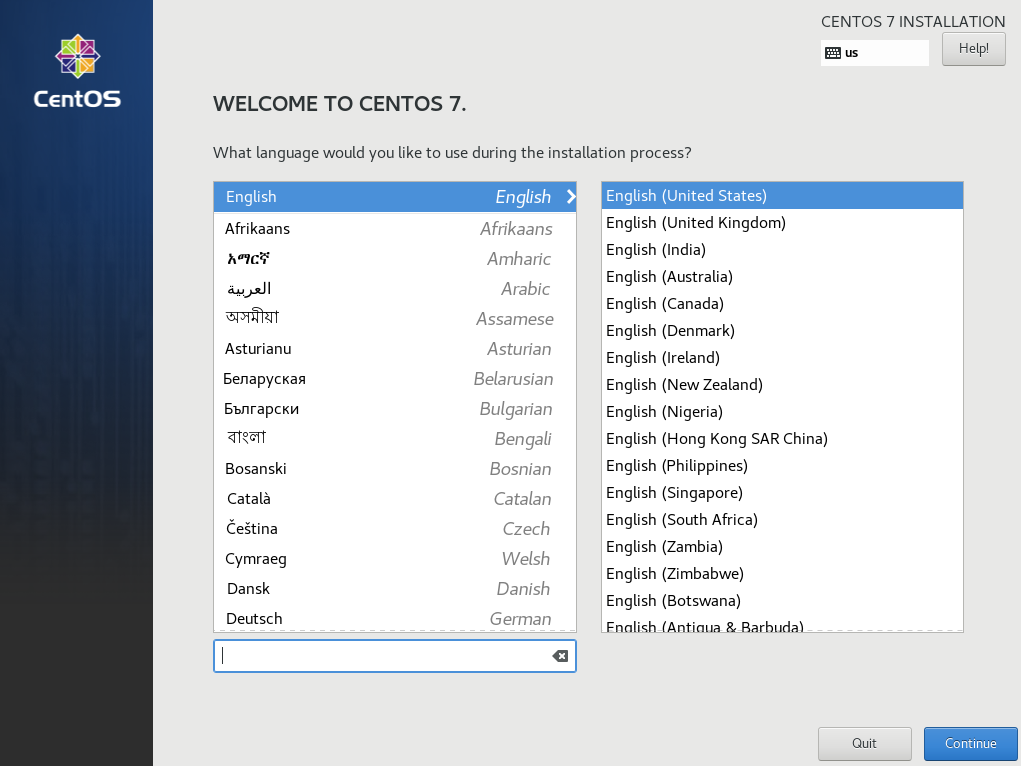
CentOS 7 Installation
Once you have a PC built or reserved for workstation use, download a DVD installation image (4.3GB) and burn it to a disk or USB mass storage device. Boot your PC and hit f2 (delete, etc.) and navigate to the boot menu in the UEFI. Once there, select your installation media and let the installer load. Note: If you own a physical copy of Resolve Studio, it comes with a custom CentOS image file can that only be burned to a DVD. That installer preconfigures drivers and some of the software discussed in this guide.
Select the “Software Selection” icon after it asks for your keyboard layout, and pick one of the desktop options (KDE or GNOME.) If you have a good idea of what else you need, you can select “Development and Creative Workstation” and do more customization in that menu. Don’t worry if you’re not sure, all of that software can be installed later, too. Next, move on to “Installation Destination.”
Partitioning
Uncheck Automatic Partitioning and start configuring your drive(s). I recommend setting your partition type to ext4 and disabling LVM. If you have a use-case for xfs or LVM, it’s fine to use them, but not if you don’t know what you’re doing. I also recommend leaving any drives you plan on putting in a softraid (if any) untouched by the installer.
Generally, you want root on an SSD, /home on a larger separate drive or partition (100gb is more than enough for root) and a spare untouched NVMe drive if you plan on setting up a Passthrough VM. I’d also recommend separating your / and /home partitions. This makes migration or recovery easier if something goes wrong down the line. If you have 32GB+ of RAM, you probably don’t need a swap file, but if you want to add one, do so now.
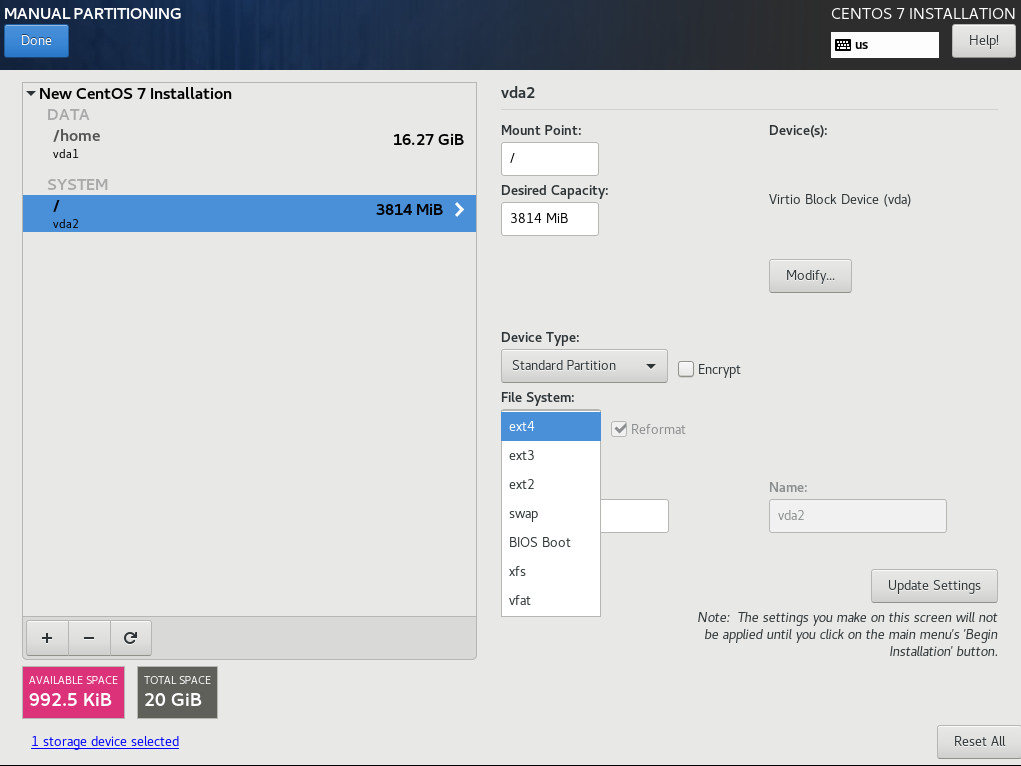
VM Example. Device types should be set to “Standard partition” and FS Type to EXT4. Sizes here not representative of a real installation.
Rationale
You don’t have to separate /home from / but it offers you a few advantages. If you mess up your installation, you can keep all your files and configuration from the previous /home, and if you choose to move to a newer centos release, those files are also preserved. If you plan on installing VMs with virtual images, then you may want to put /var on its own partition as well to provide more space.
Next, set up your networking if needed, and hit install. I wouldn’t mess with security policies unless you know what you’re doing. Once you start the installation, set up your root password and user (check “make this user an administrator.”) Reboot when the installation completes, accept the license, and log in.
The next few steps will have you running a few terminal commands, which might seem scary if you haven’t done it before. It’s pretty simple once you get used to it, though. You won’t need to use the terminal often, if at all, once you get everything set up.
Initial Setup
Once you’ve booted into a graphical environment, there’s a few things you’re going to want to do before installing any applications. First, open a terminal, and update with sudo yum update and reboot. Then, set up your softraid (if desired) via ZFS or mdadm. They can be installed as follows:
// Commands preceded by # are run as root (or via sudo) and $ run as user, // are comments and should not be run.
// Commands can be pasted into terminal by using ctrl + shift+ V
// For ZFS
// Enable 3rd party repos
# yum install epel-release
# yum install http://download.zfsonlinux.org/epel/zfs-release.el7-7.noarch.rpm
$ gpg --quiet --with-fingerprint /etc/pki/rpm-gpg/RPM-GPG-KEY-zfsonlinux
// Install DKMS and ZFS
# yum install dkms kernel-devel
# yum install zfs

// For mdadm
# yum install mdadm
Configuring these packages is out of the scope of this article, but we do have a ZFS guide already.
Nvidia Drivers
Next, it’s time to install your graphics drivers. This guide assumes you’re using Nvidia, because of AMD’s production limitations:
// Enable ELRepo
# yum install yum-plugin-fastestmirror
# rpm --import https://www.elrepo.org/RPM-GPG-KEY-elrepo.org
# yum install https://www.elrepo.org/elrepo-release-7.0-4.el7.elrepo.noarch.rpm
# yum install kmod-nvidia
Reboot your system and check that everything’s still working. If you’re having trouble it may be because you have a very old GPU, in which case you’ll want to install the 340xx version of the driver. If you are using an AMD GPU, you should try updating your kernel to mainline. Be aware that this can cause problems with certain packages, most notably zfs.
Now we’re ready to install the core applications we need to do video editing, etc. If you have any drivers for things like BMD capture cards or Red Rocket Accelerators, now’s a good time to do it. Follow the procedure outlined in the product’s manual.
Applications
Davinci Resolve
Download the most recent version of Resolve or Resolve Studio from the BMD support page. Next, install libGLU and curl-devel with sudo yum install mesa-libGLU curl-devel. Unzip the archive and double-click the run file. It may ask for sudo permissions during installation.
If you run into problems, try running it from the commandline with /opt/resolve/bin/resolve. The output should list missing dependencies or configuration errors. Make sure you have your dongle plugged in if you installed the studio version.
Reaper
Reaper installation is straightforward, just download it from the official website, unzip, run the install-reaper.sh script in a terminal, select install, select systemwide installation, (/opt) and confirm yes for desktop integration and symlinking. It may ask for a sudo password during installation. Starting it will give you an opportunity to enter your license key.
Blender
There are now up-to-date centos builds of Blender available from blender.org, but the easiest way to keep your installation up to date without manually doing local installs is installing it through the Steam game client. Both routes are perfectly valid, but if you want automatic updates and better desktop integration, here’s how to get steam working on CentOS:
# rpm --import http://li.nux.ro/download/nux/RPM-GPG-KEY-nux.ro
# rpm -Uvh http://li.nux.ro/download/nux/dextop/el7/x86_64/nux-dextop-release-0-5.el7.nux.noarch.rpm
# yum install steam
Note that you’ll need mesa-libGLU to get a local blender installation running if you didn’t install it for Resolve. If you go the steam route, all that’s left to do is launch steam and install blender from the store.
DisplayCAL
This is another straightforward installation. Download the CentOS build from the official site, and install it by running sudo yum install DisplayCAL*.rpm in the directory where you saved the package.
Maya, Houdini, Fusion, Lightworks, Natron, Nuke, Modo, etc.
By now you should get the picture. If you need one of these packages, just go to the official website, download it, and follow the vendor’s instructions to install the package.
Other Useful Software
There’s a few other things you’ll probably want to install before using your workstation in earnest. For example, you’ll almost certainly want ffmpeg and/or avidemux, GIMP for situations where you can’t rely on built-in texture or matte editors, possibly file sync or network sharing software.
All of these can be found in the CentOS repos by using yum searchand then installed with sudo yum install with the package name given to you in the results. If you do illustrations or digitally painted mattes, I’d recommend compiling Krita with EXR support. If you need something to work as a tentative replacement to substance, you can try to build Armorpaint or pay for a precompiled early version.
Many of us also do stills work: Darktable and Rawtherapee can help with raw processing. There’s also fSpy for 3d camera estimation, Inkscape for vector editing, Hugin for stitching together HDRIs, and OBS for livestreaming. I use VLC for quick monitoring, and Blackmagic’s RAW player for raw playback, too. There’s also specialty programs like Syntheyes, Instant Mesh and Mocha Pro that work on CentOS as well. You just have to look around to find things that suit your needs.
What To Expect
Following these steps should give you a working skeleton that allows you to get going on video production, but there’s still workflow refinements and system tweaks you can do to make things work exceptionally well. The next installment will cover the ins and outs of Resolve’s database system, Ingestion and file management, roundtrip vfx with blender, and more refinements that will make your job easier.
Consider Supporting us on Patreon if you like our work and want a say in what we cover and access to early content. We provide RSS feeds as well as regular updates on Twitter if you want to be the first to know about the next part in this series or other projects we’re working on. If you need help or have questions about any of our articles, you can find us on our Discord.