
There are many reasons that you might want to patch your kernel. Before it was merged upstream, Ryzen users would have to use the NPT patch. Maybe your motherboard’s IOMMU groups aren’t working out for you and you need the ACS patch. Whatever your case may be, We’ve made a short tutorial that should make the process easier.
Read Also: VFIO Audio Setup Guide
Escalating Privileges
A lot of these commands aren’t going to work unless you’re root. You can use sudo if you have it configured. For this tutorial we are just going to use su. If a command gives a permissions error during the course of the tutorial, assume escalated privileges are needed.
Linux Build Dependencies
The first thing you will need to do is get some dependencies for compiling the kernel. This can be done with one simple command.
apt build-dep linux
Next, you need to figure out what kernel you want to use. You can use the kernel that comes with Debian, or you can use the vanilla kernel from kernel.org. Using the Debian source will give you some extra patches that Debian deems necessary. The vanilla kernel doesn’t come with the extra patches. Either path you choose will be explained in this tutorial.
Downloading the Debian Kernel
If you want to use the vanilla kernel then you can skip this section and move onto “Downloading the Vanilla Kernel”.
Getting the Debian Linux source is very easy and can be done with one command.
apt source Linux
You will see it downloading, extracting and then applying different patches to the kernel.
Downloading the Vanilla Kernel
In order to download the vanilla kernel, you’ll have to navigate to kernel.org in your browser. Once there you will see there is the mainline, stable, and longterm. It is recommended to go with either the mainline or stable as they are going to be more up to date than the longterm branch. Whichever one you decide to go with just click the [tarball] on the same line, and then save it. After you’re done with that you want to extract it. This can be done by using:
tar -xvf linux-4.14.8.tar.xz
You will want to supplement the version number with whatever version you have downloaded.
Patching
Now that we have our kernel downloaded and extracted, it’s time to patch it. The first step is to navigate to the directory that was extracted
cd /path/to/linux-4.14.8/
Now that we’re in the directory, we are going to use the patch command.
patch -p1 < /path/to/filename.patch
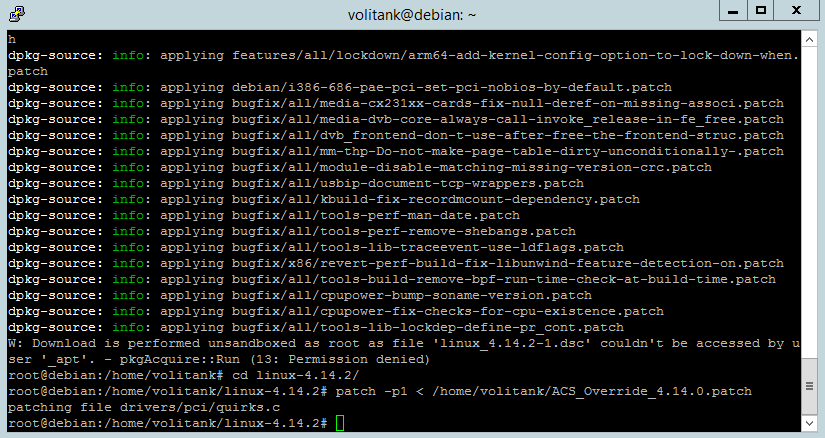
After using this command you should see that it succeeded in patching. Now you need to copy your kernel config over.
cp /boot/config-4.14.0-1-amd64 .config
You should replace the version number with your latest in that directory. If you copied the configuration from a Debian kernel we need to remove a line or it will fail.
nano .config
Towards the bottom of the file, find and remove the line below.
CONFIG_SYSTEM_TRUSTED_KEYS=
Now that the configuration is copied and the certification line is removed, we need to update it for the new kernel.
make oldconfig
Once you use this command you can hit enter for each option unless you specifically know that you need it. Now that everything is in place, it’s time to compile.
make -j8 deb-pkg LOCALVERSION=-custom
You want to replace -j8 with however many threads your processor has. the “LOCALVERSION” option can be anything you want. It’s only there for documentation purposes. Now your kernel should be compiling. This could take a while, depending on your hardware.
Installing The New Kernel
Your kernel should be built and you should drop back to a prompt. The last step is to install the newly compiled kernel. This method will put the packages in the parent directory. With this in mind, we need to navigate backwards before installing.
cd ..
dpkg -i *.deb
This will install all of the packages that you just compiled. You can also install each package separately if there are more packages in that directory that you do not want to install. For example, you may not want to install the dbg kernel package as it’s quite large and used for debugging. After dpkg is done installing the kernel, all you have to do is reboot and you should be using your custom kernel. You can verify by using this command:
uname -a
This will show you what kernel is currently being used. If you need help binding your GPU to vfio-pci you can check out our Debian Guide
Join our Discord server and discuss our content with the community!
Images courtesy Pixabay