
Input is often the first hurdle presented after getting a passthrough VM up and running. Without Spice or VNC, users often resort to hacks and workarounds to control their virtual machine. Passing through USB devices via evdev has become a popular if badly documented way of handling input. The advantage of evdev is that it has very low latency and overhead. The downside is that it becomes frustrating to switch between the host and guest.
Read also: A Quick And Dirty Arch Passthrough Guide
At the time of writing, The Arch wiki has better instructions on how to set this up.
What is Evdev?
Configuring Evdev
ls /dev/input/by-id
It will contain your input devices. Take note of which ones you want to pass through. Be careful here, as I have noticed two common discrepancies. The first is an “if01” or “if02” or similar near the end of an input device name. The best method to find out which one is correct is to use “cat.” Run:
cat /dev/input/by-id/[input device id]
Press random keys on the keyboard you want to pass through. If garbled characters appear on-screen, you have selected the correct one. If not, try another until you find the correct one. Use Ctrl+C to cancel the “cat” process. Another issue to be wary of is the input device type. A lot of mice will have keyboard inputs, and some keyboards even have mouse inputs. Select the input device that corresponds to your device. For example, if you see two entries for your keyboard, with one ending with “event-kbd” and the other ending with “event-mouse,” you will generally want to pick “event-kbd.” Some hardware manufacturers hate following standards, though, and you might find yourself needing to switch this up.
Now that you’ve noted the devices you want to use evdev with, it’s time to enable it in your libvirt XML. Open the XML with the following, replacing “nano” with your editor of choice, and “win10” with the name of your libvirt domain:
EDITOR=nano virsh edit win10
Make sure the first line looks like this:
<domain type='kvm' id='1' xmlns:qemu='http://libvirt.org/schemas/domain/qemu/1.0'>
If it doesn’t, replace the first line with that. Next, add the following near the bottom, directly above “</domain>”:
 <qemu:commandline>
 <qemu:arg value='-object'/>
 <qemu:arg value='input-linux,id=mouse1,evdev=/dev/input/by-id/MOUSE_NAME'/>
 <qemu:arg value='-object'/>
 <qemu:arg value='input-linux,id=kbd1,evdev=/dev/input/by-id/KEYBOARD_NAME,grab_all=on,repeat=on'/>
 </qemu:commandline>
If you already have qemu:commandline set up for whatever reason, add the qemu:arg options above to that section. Don’t add another set of qemu:commandline arguments. Replace the MOUSE_NAME and KEYBOARD_NAME parts with the id of your input devices. Next, save the XML. In nano, you can do this with Ctrl+X, then Y, then Enter. Boot up your VM. It should now work, with the keyboard and mouse being directly passed to the VM! By hitting both Ctrl keys at the same time, you can switch between hosts. Wonderful, isn’t it?
Switching from PS/2 to VirtIO
As with many other technologies, VirtIO has the capacity to improve evdev virtual input devices’ responsiveness. It is not necessary to remove the PS/2 input devices and replace them. Instead, you can simply add VirtIO input devices to the LibVirt XML file, install the guest drivers, and profit! Find the following section of your XML:
<input type='mouse' bus='ps2'/>
<input type='keyboard' bus='ps2'/>
Add VirtIO mouse and keyboard devices, so in the end it looks like so:
<input type='mouse' bus='virtio'>
        <address type='pci' domain='0x0000' bus='0x00' slot='0x0e' function='0x0'/>
</input>
<input type='keyboard' bus='virtio'>
        <address type='pci' domain='0x0000' bus='0x00' slot='0x0f' function='0x0'/>
</input>
<input type='mouse' bus='ps2'/>
<input type='keyboard' bus='ps2'/>
Save the XML file and restart your virtual machine. Now, following the exact same procedure as other VirtIO drivers, install the VirtIO input devices in Windows from the VirtIO driver ISO image:
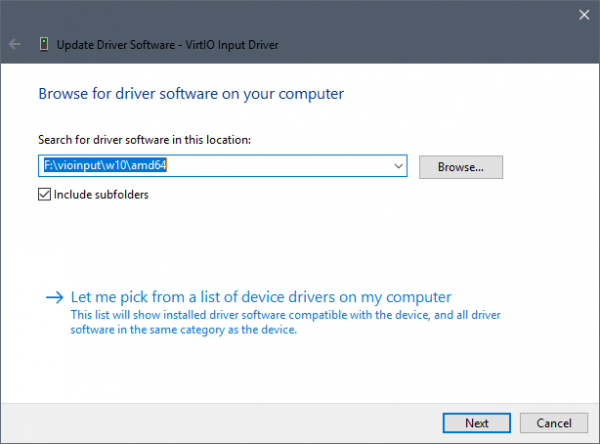
Complete this step for the mouse and keyboard devices. After this, all should be well.
Troubleshooting
Permission Errors
There are a wide variety of causes for permission issues with evdev passthrough. To start, let’s set up cgroup_device_acl in libvirt’s configuration. Ensure the following is in /etc/libvirt/qemu.conf, of course replacing KEYBOARD_NAME and MOUSE_NAME:
cgroup_device_acl = [
        "/dev/null", "/dev/full", "/dev/zero",
        "/dev/random", "/dev/urandom",
        "/dev/ptmx", "/dev/kvm", "/dev/kqemu",
        "/dev/rtc","/dev/hpet",
        "/dev/input/by-id/KEYBOARD_NAME",
        "/dev/input/by-id/MOUSE_NAME"
]
Now restart libvirtd with
systemctl restart libvirtd
for systemd distributions, and
rc-service libvirtd restart
for OpenRC distributions like Gentoo and Artix.
If this still throws a permission error, the likely cause is that qemu is running as a user that does not have access to the input devices for security reasons. There are a few ways to get around this by changing the user that libvirt spawns the qemu process as (note that this will most likely break any PulseAudio passthrough you may have done, if you already updated this to your user):
user = "root"
group = "root"
This method is a bit overkill, as it effectively removes all sandboxing that libvirt applies by running the user as a non-root user by default. If you don’t use pulseaudio, and you still want sandboxing, then follow the instructions here:
First, create a new user/group to sandbox as, for example “evdev”:
useradd -s /usr/sbin/nologin -r -M -d /dev/null evdev
groupadd evdev
usermod -a -G input evdev
With that done, you’ve now created a user that has no home directory that can’t normally be logged into from a login shell, and added the new user to the input group that is necessary to read the files for evdev. Following this, update the qemu.conf to reflect these changes:
user = "evdev"
group = "evdev"
Finally, if you do require PulseAudio, all you need to do is add your user to the input group (Assuming that you already have PulseAudio working properly.)
gpasswd -a <your user> input
If this still throws a permission error, set the following in the same file:
clear_emulator_capabilities = 0
Any permission issues should now be solved.
Mouse/Keyboard perform badly in games
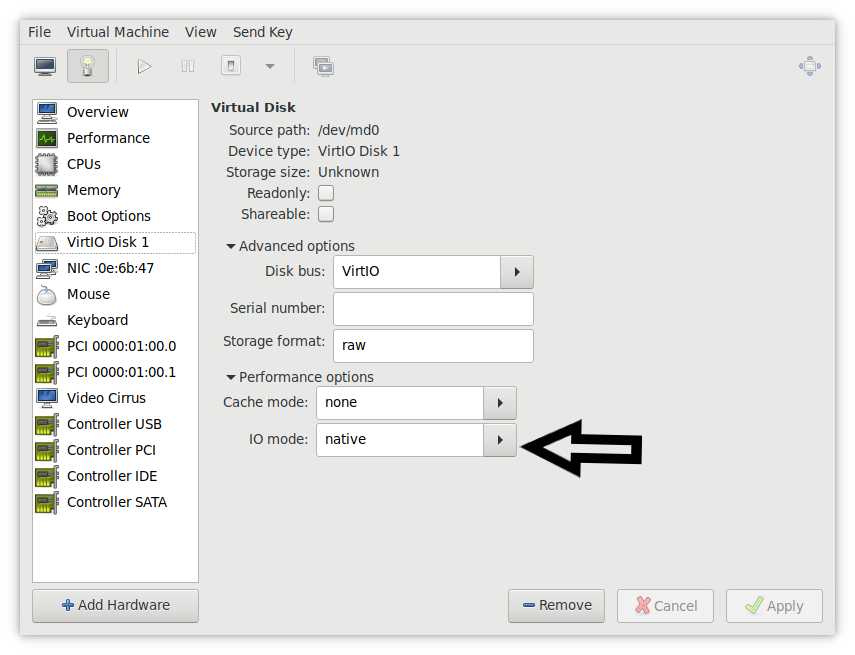
By default, QEMU runs many things on its own watchdog thread. This includes disk I/O and PS/2 keyboards (which evdev passthrough uses). When running on the same thread, sometimes one of these subsystems being under heavy load can affect the other. As a result, after loading into Windows the mouse is smooth, but booting a game immediately causes input performance to drop.
Luckily, libvirt can configure QEMU to separate the I/O off of the main thread, leaving the main thread free for input. Doing this in virt-manager is very simple – go to the settings for your disk and change IO mode from “default” or “native” to “threads.” Be sure to do this for all of your disks – especially those that have games on them.
How has Evdev Passthrough worked out for you? Let us know in the comments below.
Join our Discord to chat with other readers and our writers
Images Courtesy PixaBay