Having a dedicated PFsense box is awesome. The software itself is stellar and having a dedicated machine to run it on is awesome. That said, running a virtual PFsense box using your spare CPU time on your work PC is even more awesome.
Read Also: Quick and Dirty Arch Passthrough Guide
As computer, and Linux, enthusiasts, we tend to not be too keen on shutting down our computers, as uptime is a wonderful metric to settle online measuring contests of our digital appendages. Other than bragging rights, though, there are good reasons to keep our main PC on, one of which is serving double duty as your home router, if you could just figure out how…
Enter VFIO and PFsense, two wonderful tools that make a double duty router/PC a reality. In addition to being a wonderful “hold my beer” configuration for your home network, a desktop computer that runs a virtualized guest router (via PFsense) is a great way to economize on hardware while giving yourself more control of your network.
With the power of vfio and kvm you can set a router VM up as you would a normal pfsense router installation, with just a little extra prep. This tutorial assumes you have at least a basic knowledge of virtual machine and router setup, and you already have OVMF installed. You’ll also need at least one dedicated NIC and/or wireless card, and a Motherboard with proper IOMMU isolation (unless you want to fuss with kernel patches)
Initial Setup
We use a usb wifi dongle on the host, and a PCIe NIC/Native Intel NIC to make a router/AP in this tutorial, but many other combos will work just as well. Be careful, though, if you have a gpu assigned to a gaming vm, you will have to make sure that the network card is in a different IOMMU group.
The process of passing through a pci express device to a vm is simple. First, add the requisite bootloader kernel options. On an intel system with GRUB, that’s:
sudo nano /etc/default/grub ... GRUB_CMDLINE_LINUX_DEFAULT="...(other options)... intel_iommu=on" ... |
ctrl+x then y to exit
then regenerate grub.cfg with
sudo grub-mkconfig -o /boot/grub/grub.cfg
and reboot. (Warning: changing your bootloader options may differ from distro to distro.)
Finding your Network Devices
From here we need to find the Device IDs of your NICs and isolate them from your host system. We do that by running
lspci -nn
and looking for our PCIe NICs in the resulting output.

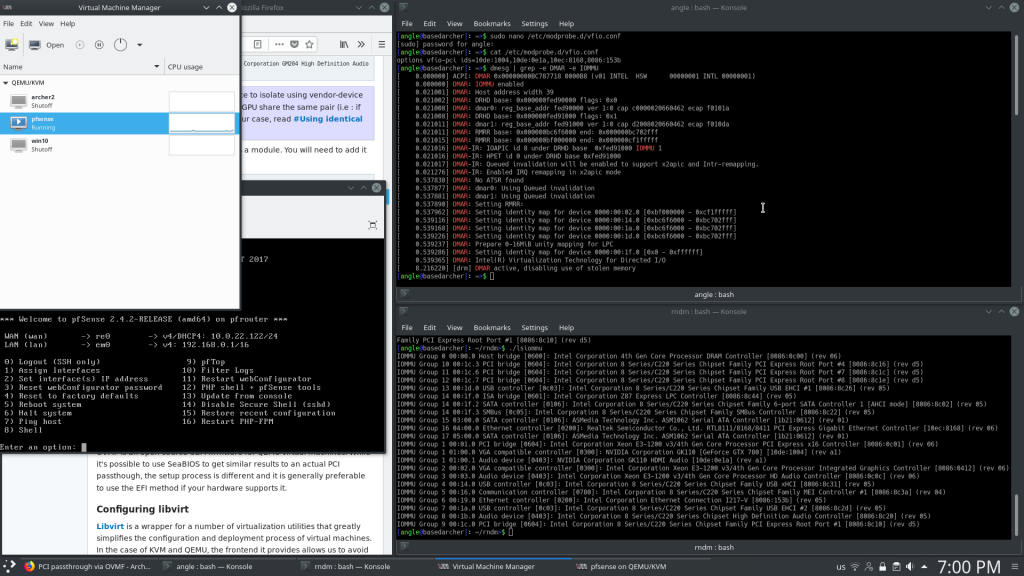
Example of “lspci -nn” output
we want the 8 digit codes separated by colons at the end of the description strings (e.g. 10ec:8168 and 8086:153b in my case) and put them in our vfio.conf to isolate them:
sudo nano /etc/modprobe.d/vfio.conf
type
options vfio-pci ids=your:nic1,your:nic2 (where your:nicx is the device ID of your target network devices)
save, and exit.
Now we need to rebuild the initramfs. This is done one of several different ways depending on your distro of choice, but for the purposes of this tutorial we’ll be using Arch Linux:
sudo nano /etc/mkinitcpio.conf
and add
MODULES=”vfio vfio_iommu_type1 vfio_pci vfio_virqfd”
and make sure modconf is in HOOKS.
then just run mkinitcpio -p linux and reboot.
Setting up the Hypervisor
In order to get up and running with the KVM hypervisor we need the packages
qemu, libvirt and virt-managerIn arch it’s as simple as:
sudo pacman -S qemu libvirt virt-manager
The last configuration step before jumping into the gui is changing qemu.conf as needed. In /etc/libvirt/qemu.conf change the permissions to be: user = “root” group = “kvm” (exactly as shown).
sudo nano /etc/libvirt/qemu.confthen type/change the variables:
user= "root" group= "kvm" |
press ctrl+x, then Y to change the settings
An extra step I had to take and (you might have to, too,) is uncomment clear_emulator_capabilities and change it from 1 to 0. It was needed for my particular setup since I was having issues.
Next we set the services to start on boot with the command:
sudo systemctl enable libvirtd sudo systemctl start libvirtd sudo systemctl enable virtlogd.socket sudo usermod -a -G kvm [your-username] |
Final Steps: Setting up PFsense
From now on, the process is GUI only. Fire up virt-manager and make a new VM. PFsense uses FreeBSD as a base so that’s the operating system type to pick. Set up the VM like you would a router on baremetal. Two points to watch out for are:
- pick macvtap for the network (you can use the WiFi interface of the host if you’re doing it the way I am, it really doesn’t matter though, we’ll remove it later) and set it in bridge mode
- when presented with the checkbox, click customize configuration before install.
The configuration required is pretty simple. First, set your CPU type to host-passthrough, by manually typing it into the virt-manager dialog. Second, go to add hardware and pick the NICs we’ll use from PCI host devices. Finally, before installation begins, remove the NIC that was automatically created by right clinking on it and then remove hardware. Virtual machine configuration is over with so click begin installation. PFsense is easy to get up and running.
The steps are pretty self-explanatory, basically just click next. The important part is where we pick which interface will serve what purpose. Select the NIC you want for WAN and the one you want for LAN. It was simple in my case since I wanted the Intel gigabit NIC for LAN and the Realtek NIC for WAN.
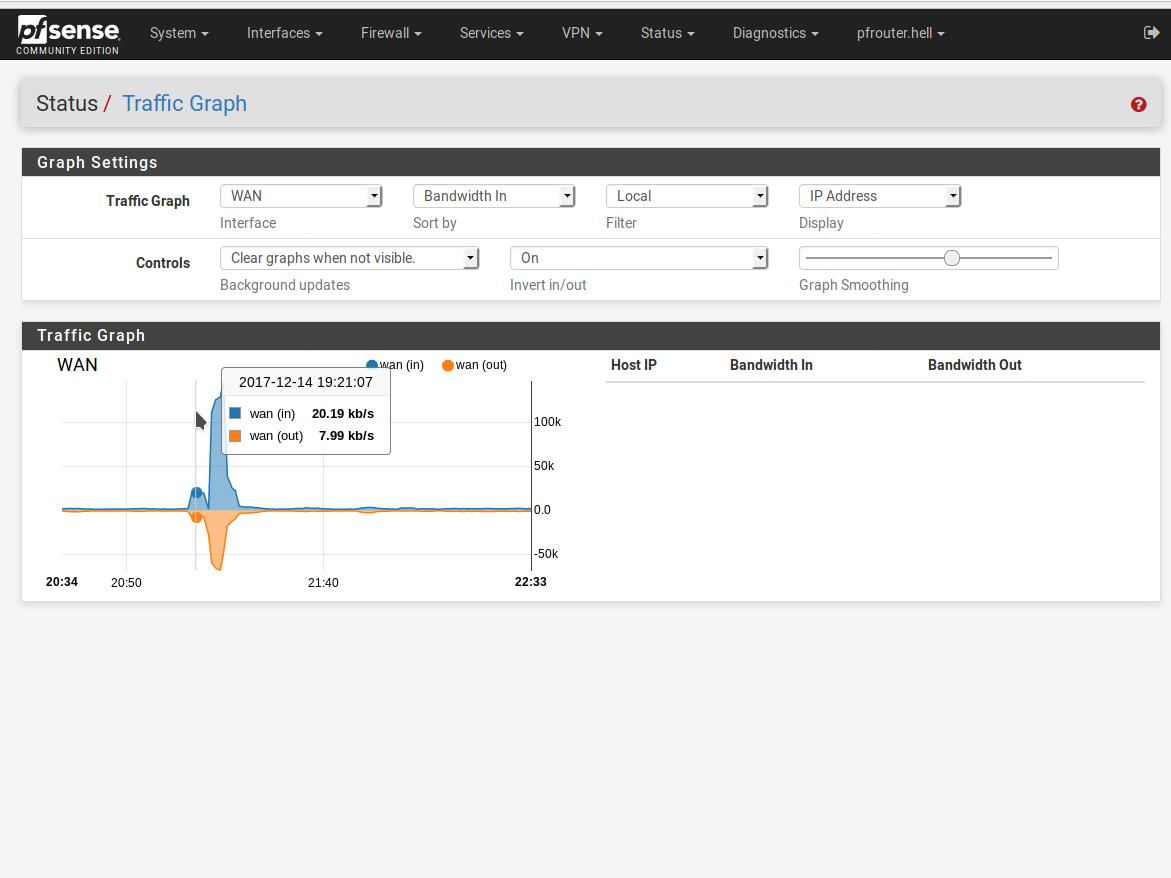
We’re getting pretty close to the end, software setup is almost done. Using a crossover ethernet cable or by plugging a switch into the LAN interface you’ll have access to the PFsense web GUI. The default address it provides is 192.168.1.1 (unless this was changed). Navigate to that using your favorite web browser and go through the setup wizard. Make any changes necessary to accommodate your specific needs and feel free to explore this really awesome piece of software.
You are now the proud owner of a fully VFIO-powered PFsense router.
Join our discord to discuss virtual routers and other virtualized appliances!
Recommended read: Arch Linux Wiki PCI Passthrough