
In our last article, we touched upon configuration and basic usage of ZFS. We showed ZFS’s utility including snapshots, clones, datasets, and much more. ZFS includes many more advanced features, such as ZVols and ARC. This article will attempt to explain their usefulness as well.
See Also: ZFS Configuration on Linux – Setup and Basics
ZFS Volumes
ZFS Volumes, commonly known as ZVols, are ZFS’s answer to raw disk images for virtualization. They are block devices sitting atop ZFS. With ZVols, one can take advantage of ZFS’s features with less overhead than a raw disk image, especially for RAID configurations.
You can create a ZVol with one simple command:
sudo zfs create -V 10gb poolname/zvolname
Now run a quick ls and see the results:
# zfs create -V 10gb testpool/zvoltest1
# ls /dev/zvol/testpool
zvoltest1
#
The location of the ZVol in this example is /dev/zvol/testpool/zvoltest1. You can treat this like any other block partition, like /dev/sda3 or /dev/sdd5, for example. To pass it through to a VM, you can use it in place of a .img file. For example:
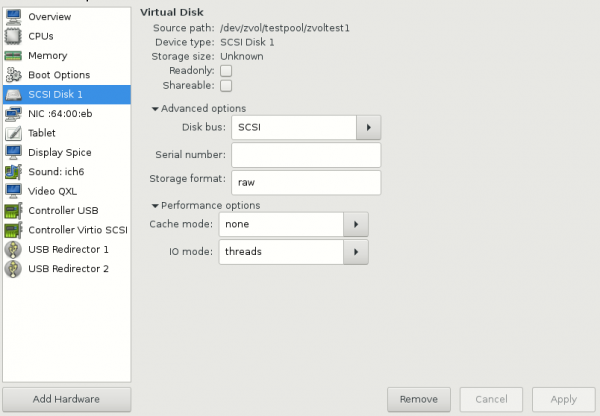
Notice the Cache Mode and I/O mode. These settings, particularly the latter, can help prevent I/O-related hangs and stutters. Many users experiencing choppy evdev passthrough performance have found a fix here.
Outside of virtualization, ZVols have many uses as well. One such use is as a swap “partition.” Courtesy of the ZoL Wiki, swap volumes can be created as such:
sudo zfs create -V 4G -b $(getconf PAGESIZE) -o compression=zle \
 -o logbias=throughput -o sync=always \
 -o primarycache=metadata -o secondarycache=none \
 -o com.sun:auto-snapshot=false poolname/swapzvol
Of course, replace 4G with the size you want for the swap volume. Afterwards simply format and enable it as so:
sudo mkswap -f /dev/zvol/poolname/swapzvol
sudo bash -c 'echo /dev/zvol/poolname/swapzvol none swap defaults 0 0 >> /etc/fstab'
sudo swapon -av
The final use this article will mention is for legacy filesystems atop ZFS. If you have an application that does not play nicely with ZFS, this is a must. You can make an ext4 filesystem (or any filesystem, for that matter) on a ZVol like so:
sudo mkfs.ext4 /dev/zvol/poolname/zvolname
After adding it to your fstab, you can mount it and treat it like any other disk partition. The cool part about this is that the whole ext4 volume gets ZFS’s features such as snapshots, native compression, cloning, RAID, and more.
LZ4 compression
ZFS features native compression support with surprisingly little overhead. LZ4, the most commonly recommended compression algorithm for use with ZFS, can be set for a dataset (or ZVol, if you prefer) like so:
# For a ZVol
sudo zfs set compression=lz4 poolname/compressedzvol
# For a dataset
sudo zfs set compression=lz4 poolname/compresseddataset
With compression, one can use less storage space for the same amount of data. With ZFS, compression is completely transparent. ZFS compresses under the hood and all applications should work with it.
ARC
ARC, or “adaptive replacement cache,” is ZFS’s built-in cache in RAM. It is much more aggressive than Linux’s built-in RAM caching. For this reason, some users may find that the ARC cache uses too much of their RAM. While free RAM is wasted RAM, OpenZFS does offer a way to adjust the maximum ARC RAM usage. You can tweak it with a kernel command line parameter. For GRUB, find the following line in /etc/default/grub:
GRUB_CMDLINE_LINUX_DEFAULT="quiet"
Add “zfs.zfs_arc_max=(size)” as such, with size in bytes:
GRUB_CMDLINE_LINUX_DEFAULT="quiet zfs.zfs_arc_max=1073741824" # For 1GiB
Regenerate the GRUB configuration as such:
sudo grub-mkconfig -o /boot/grub/grub.cfg
It is recommended to leave this value as high as possible without running out of RAM, as it helps performance considerably.
L2ARC
Level 2 ARC is a great solution to those who want tons of fast storage for mechanical HDD prices. You can use a fast disk, such as an SSD, to cache commonly accessed data for better read performance. To add an L2ARC, run the following:
sudo zpool add poolname cache YOURDEVICEID
Where YOURDEVICEID is the device ID from /dev/disk/by-id/. For example, on my system:
# ls /dev/disk/by-id
ata-WDC_WD1002FAEX-00Y9A0_WD-WCAW33641222 wwn-0x50014ee25e646ba3
ata-WDC_WD1002FAEX-00Y9A0_WD-WCAW33641222-part1 wwn-0x50014ee25e646ba3-part1
ata-WDC_WD10EZEX-00KUWA0_WD-WCC1S5941691 wwn-0x50014ee25e646ba3-part2
ata-WDC_WD10EZEX-00KUWA0_WD-WCC1S5941691-part1 wwn-0x50014ee25e646ba3-part3
ata-WDC_WD10EZEX-00KUWA0_WD-WCC1S5941691-part2 wwn-0x50014ee2b1a6926d
ata-WDC_WD10EZEX-00KUWA0_WD-WCC1S5941691-part3 wwn-0x50014ee2b1a6926d-part1
You can choose any of these, depending on whether you want the entire drive or simply a single partition.
ZIL
As L2ARC improves read performance by caching it on a faster drive, ZIL does the same for writes. As such, it is probably not needed unless you have a write-intensive workload. Adding a ZIL is nearly identical to adding an L2ARC:
sudo zpool add poolname log YOURDEVICEID
Again, substitute YOURDEVICEID depending on your hardware.
Mounting your XMLs on a dataset
You can create a completely separate dataset to store your libvirt XMLs on. You can use this to easily roll back XML breakages. Libvirt stores XML files in /etc/libvirt/qemu. To have success you will need to move all the files out temporarily, make the dataset, mount it, and move the files back in.
sudo mkdir /tmp/qemubak
sudo mv /etc/libvirt/qemu/* /tmp/qemubak
sudo zfs create -o mountpoint=/etc/libvirt/qemu poolname/xml
sudo mv /tmp/qemubak/* /etc/libvirt/qemu/
That is all that is needed. You can now snapshot the poolname/xml dataset after making changes to XMLs to ensure you can roll back unwanted changes.
Join our Discord to get help from ZFS users! Check out the VFIO Increments page for part recommendations and advice.
Images courtesy PixaBay